Instructions for using the WildFireWeb® Content Management System
Mac Mail
Setting up a New Mac Mail Account
(If this is the first Mac Mail Account on your Mac)
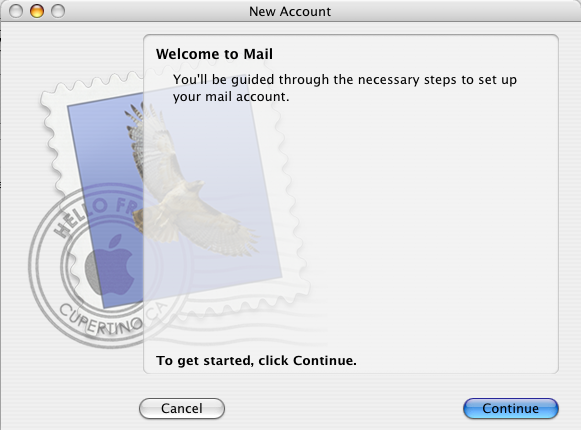
Click the "Mac Mail" icon in the dock

Click the "Continue" button
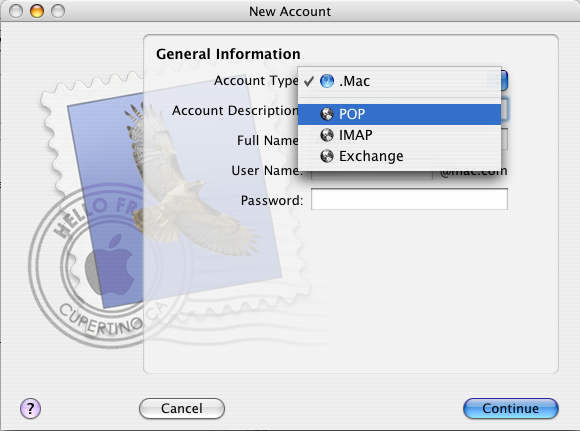
From the "Account Type" drop down menu, select "POP"
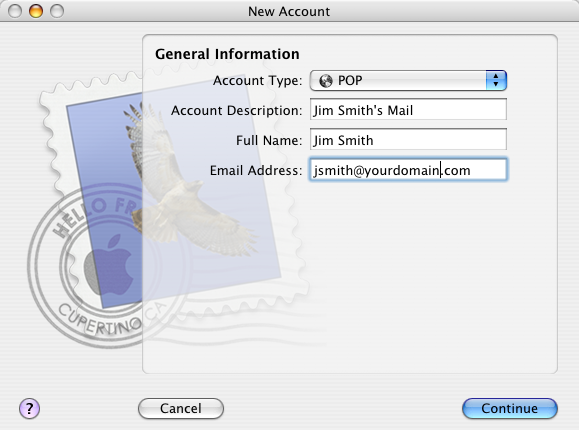
1- Enter the Account Description
(this can be anything, but should make sense to "you")
2 - Enter your full name
3 - Enter your e mail address
(substituting "yourdomain" with your actual domain name)
4 - Click "Continue"
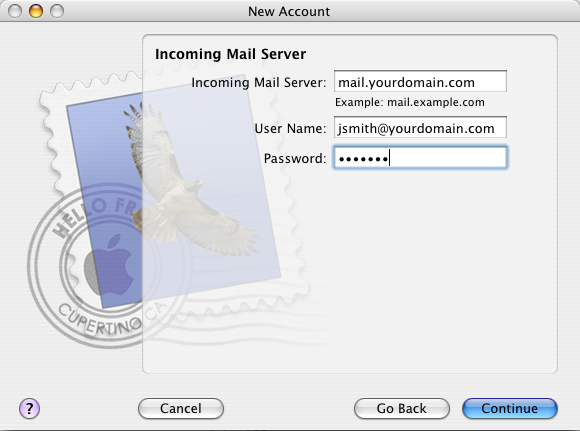
1- Enter the Incoming Mail server Information
(just as you see here, substituting "yourdomain" with your actual domain name)
so, if your domain is "greatrentals.com" the incoming mail server would be
mail.greatrentals.com
2 - Enter your username
(on the WFW mail server, your mail username is your full e mail address)
3 - Enter your Password
4 - Click "Continue"
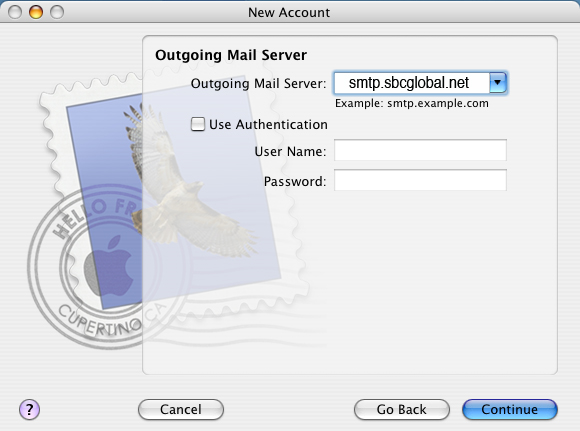
Enter the name of your outgoing mail server.
**This information is supplied by your ISP (Internet Service Provider)
It will be something like...
smtp.sbcglobal.net
smtp.comcast.net
smtp.earthlink.net
If you are unsure, check with your service provider for the correct Outgoing mail server name.
Leave the User Authetication fields blank.
Click "Continue"
Mac Mail will test the connection using the information provided, if it is successful, you will see an account summary window. Click "Continue" to complete the set up process.
If the connection was not successful, click the "Go Back" button and look at each of the windows to be sure you have entered all information accurately. Also be sure that your are connected to the internet. The process can not complete if you do not have a current connection to the internet.
Setting up a New Mac Mail Account
(If this is the first Mac Mail Account on your Mac)
Click the "Mac Mail" icon in the dock
Click the "Continue" button
From the "Account Type" drop down menu, select "POP"
1- Enter the Account Description
(this can be anything, but should make sense to "you")
2 - Enter your full name
3 - Enter your e mail address
(substituting "yourdomain" with your actual domain name)
4 - Click "Continue"
1- Enter the Incoming Mail server Information
(just as you see here, substituting "yourdomain" with your actual domain name)
so, if your domain is "greatrentals.com" the incoming mail server would be
mail.greatrentals.com
2 - Enter your username
(on the WFW mail server, your mail username is your full e mail address)
3 - Enter your Password
4 - Click "Continue"
Enter the name of your outgoing mail server.
**This information is supplied by your ISP (Internet Service Provider)
It will be something like...
smtp.sbcglobal.net
smtp.comcast.net
smtp.earthlink.net
If you are unsure, check with your service provider for the correct Outgoing mail server name.
Leave the User Authetication fields blank.
Click "Continue"
Mac Mail will test the connection using the information provided, if it is successful, you will see an account summary window. Click "Continue" to complete the set up process.
If the connection was not successful, click the "Go Back" button and look at each of the windows to be sure you have entered all information accurately. Also be sure that your are connected to the internet. The process can not complete if you do not have a current connection to the internet.